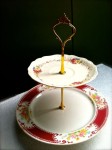
I love tiered stands – whether they all match or they are all different – a tower of vintage plates filled with yummy treats is so pretty. As I have collected many dishes for Southern Vintage Table, some have come with chips, cracks and other imperfections. Although their lives as dinner or salad plates may be gone, many now sit either under or on top of a stack of vintage lovelies. If you love the look and have some vintage china you’d like to transform into a tiered stand, today’s post will help get you started!
Tip 1: Find a good set of basic directions.
Months ago I researched how to make a tiered stand from vintage plates and found many helpful websites. I like the directions found on “Make a Vintage Cake Stand” on Caroline’s blog, Lifestyle from Caroline. Her steps are a good place to start, but read on because I have more great tips you’ll want to know.
Tip 2: Make a cardboard template to help find the center of the plate.
Finding the center is easier said than done! After struggling with an easy, reliable technique, I finally came upon this idea and it works amazingly well.
Measure and cut a piece of cardboard that’s 11″ x 11″ or 10.5″ x 10.5″. Then measure and draw lines 1 inch and 2 nches from the edge on all four sides. If you wish to get even more precise, draw a third square at 1.5 “. As you can see, my template is not perfect but still works well enough.
Now place the plate in the center so that all edges are evenly spaced between the drawn lines. Take a ruler, place it diagonally, making sure it’s at the intersection of the squares in the corner. Draw a line near plate’s center with a non-permanent marker. Repeat the steps for the other two diagonal corners. Where the two drawn lines intersect is the center.

Tip 3: Get the plate up off the surface.
When you are ready to drill with the tile drill bit, elevate and support the plate on two pieces of wood situated between the center. When you finally drill through the plate, you don’t want the drill bit hitting the work surface.
Tip 4: Drill from both sides.
When your drill has peeked through the underside, flip the plate and drill from the backside. This will help you drill the hole through the plate more quickly.
Tip 5: Be ready with water.
Have a cup of water close by to cool down the drill bit – it gets very hot and can cause the plate to break. Dip the hot drill bit in the water and you’ll hear a hissing sound as it cools. Also, splash the plate with a bit of water to cool it down as well.

Tip 6: Consider buying your tiered hardware from Etsy.
Caroline suggests Amazon or ebay for the tiered hardware but I think Etsy is the best choice. I really appreciate the philosophy of Etsy – it’s a group of online shops that either sell vintage, handmade or craft items and many are women-owned. There’s no bidding and many of the shops are in the US. I found that most of the tiered hardware on ebay comes directly from China, Hong Kong or Australia, which means shipping costs more and takes longer. I would also suggest buying more than one set – you’ll get hooked once you get started!
Tip 7: Choose 4-6 mixed and matched plates.
To maximize the versatility with your tiered stand, go ahead and select 4-5 plates that coordinate with each other. If you can, have three different sizes of the same pattern and then two or three patterns that go well with the main pattern. You can then have a tiered stand with all the same pattern or a stand with ones that look nice together.
These beautiful vintage china stands are available from Southern Vintage Table. Create you own or request a set for your next gathering. Your tasty treats will look so lovely! Be sure to see more of our tiered and cake stands on our Pinterest board.
• — • — • — • — • — • — • — • — • — • — • — • — • — • — • — •


