
I am very excited about our next event because this time it’s very personal. Although I’m not ready to reveal details, I’d like to share how I will be making this family gathering festive and colorful by making a set of no-sew buntings. This is my third time making these (one for Melanie’s Linen’s Lace & Lingerie shower and the other for Gerri’s baby shower) and now I have some terrific hints to share with you on how to make your own!
Step 1 – Select your fabric.

For this family party our color scheme is blue, white and yellow. I decided to go with two blue patterns, two amber and one white. I love paisley and floral prints as you can see! My basic formula is to select one large print, two smaller ones and a polka dotted or striped pattern. Another idea for fabric would be to use vintage pillow cases, sheets or colorful prints from vintage clothing.
With 1 yard of each, I will easily have enough to make 2 buntings with large triangles and several smaller ones as well. It’s also nice to have some extra cloth for small touches in other areas of the decor. I don’t have a plan for that just yet but I think something will come up. If you are making only one or two strands, you can probably get by with less but the needed yardage depends on how many prints you will be using and how long you want your strand to be.
Step 2 – Gather your supplies.


In addition to the fabric, you’ll need to get bias tape and fusible bonding web. Purchase two rolls of fusible bonding web – 1/4 inch and 5/8 inch. When you glue the sides of the triangles it will be so much easier with the smaller width. The wider width will come into play when you press the bias tape to the triangles.
You’ll also need a good pair of scissors, an iron and I would also recommend using starch when pressing the fabric. It will stiffen up the fabric and help with wrinkles at the same time. The triangle with the A is a from a former paper bunting that I am now repurposing as my pattern.
Step 3 – Fold and press fabric and cut your triangles.


Using your triangle pattern as a guide, fold over one end of the cloth, spritz with starch and press a crisp edge at the fold. I usually pin the pattern and then cut one triangle at a time down the folded edge for each of the fabrics.
Step 4 – Glue the edges with the fusible bonding web.
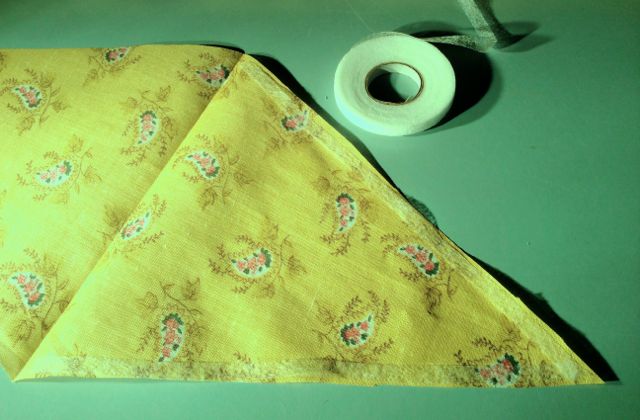
Open the fabric triangle and cut two pieces of fusible bonding web on the edge of the triangle. Refold the fabric and press with your iron. Start at the folded edge and move to the point by picking up the iron as the glue melts. Read over the directions on the package for more guidance. Here’s a tip – once you have glued the edges to a triangle, I found it easier to use as my template than the paper one.
Step 5 – Attach the triangles to the bias tape.


First, find the center of the bunting and pin it. This is where you will glue your first triangle. Then decide the order of the prints. The middle print will be first triangle to add at the center of the bias tape. Open the tape and insert the triangle. Cut a piece of fusible bonding web and press. You’ll add each triangle, one at a time down the tape. If you will be tying the bunting to something when you hang it, be sure to leave about a foot of the tape free at each end.
Once you have added all the triangles, you’ll need to flip the bunting strand and glue the other side of the bias tape. When doing this side, you can just roll out the fusible bonding web and press down the length of the tape without cutting for each triangle.
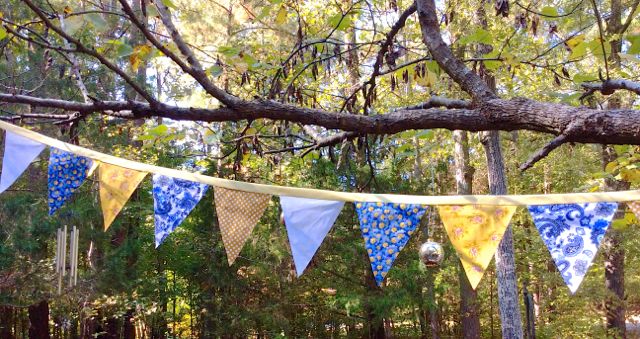
That’s it! You have a festive, colorful and custom bunting to hang! I love seeing them on the front of a food or drink table, across the entrance doorframe and even on a cake. (Thank you, Tammy, for all of these ideas!) I plan to make 2 or 3 large triangle buntings, several medium and a couple of teenie ones. Somehow I know I’ll find a place to use all of them!
Next weekend is our family gathering so you’ll see these on display in two weeks!
• — • — • — • — • — • — • — • — • — • — • — • — • — • — • — •
![]()